Azure DevOps Process Migration Guide (Microsoft Process Migrator)
Using Microsoft Process Migrator
This guide shows you how to migrate Azure DevOps process templates (work item types, states, fields, rules, layouts) from one organization to another using the official Microsoft Process Migrator tool.
Table of Contents
What Gets Migrated
Process Templates
- Process template structure and inheritance
- Process descriptions and metadata
Work Item Types
- Custom work item types
- Inherited work item types (Bug, Task, etc.)
- Work item type colors and icons
States & Workflows
- All workflow states (New, Active, Resolved, Closed, custom states)
- State transitions and rules
- State categories (Proposed, InProgress, Completed, Removed)
Fields
- Custom fields (collection-level)
- Field configurations per work item type
- Field types (Text, Number, Identity, Picklist, etc.)
- Field default values
Rules
- Work item rules and validations
- Field rules
- Conditional rules
Form Layouts
- Work item form structure
- Field groupings
- Page layouts
- Control configurations
Behaviors
- Backlog behaviors (Stories, Epics, Features, Tasks)
- Custom behaviors
- Behavior associations with work item types
Picklists
- Picklist definitions
- Picklist values
- Picklist associations with fields
What Is NOT Migrated
- Actual work items (data)
- Work item history
- Attachments
- Pipelines
- Repositories
- Boards configuration
- Teams and permissions
- Test results
Note: For work items migration, use additional tools like nkdAgility Migration Tools or Microsoft WiMigrator.
The upstream Microsoft Process Migrator repo only calls Azure DevOps process APIs (templates, WIT definitions, fields, rules, layouts) and does not migrate any of the items above. These exclusions are not spelled out in that repo’s README, so rely on this list and, if needed, validate by exporting and reviewing output/exported-process.json.
Prerequisites
1. Node.js and NPM
Check if installed:
1
2
node --version  # Should be v8.11.2 or higher
npm --version
2. Personal Access Tokens (PATs)
You need PATs for both source and target organizations.
Create PAT for Source Organization:
- Go to:
https://dev.azure.com/{YOUR_SOURCE_ORG} - Click your profile settings (top right)
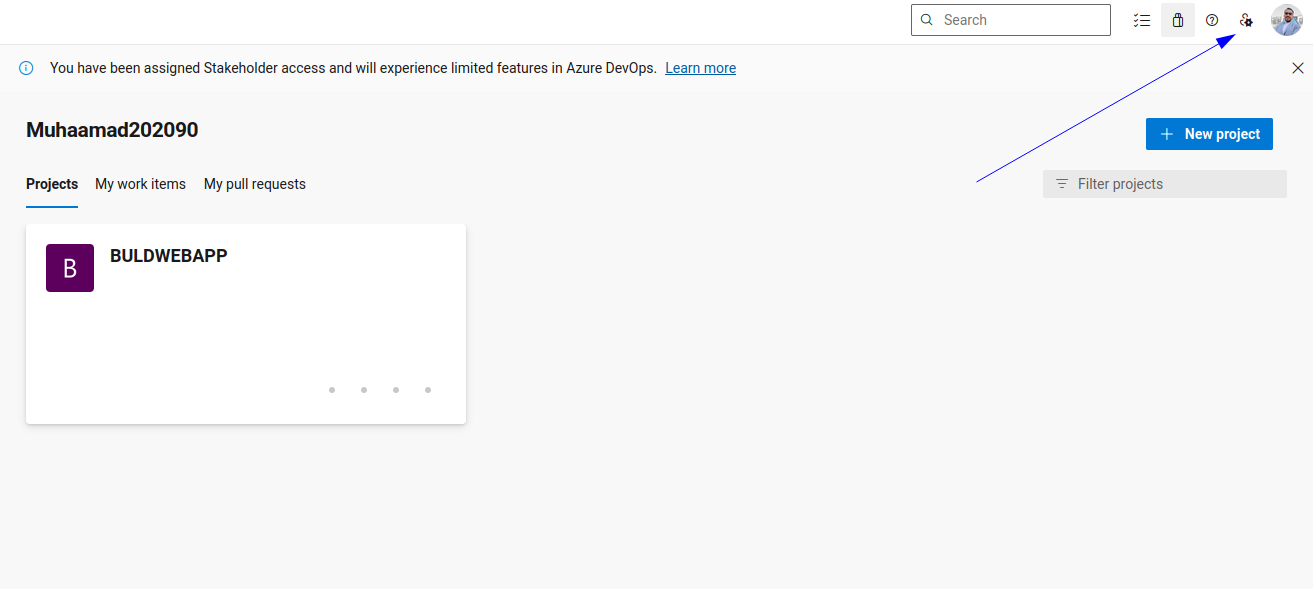
- Click “Personal access tokens”
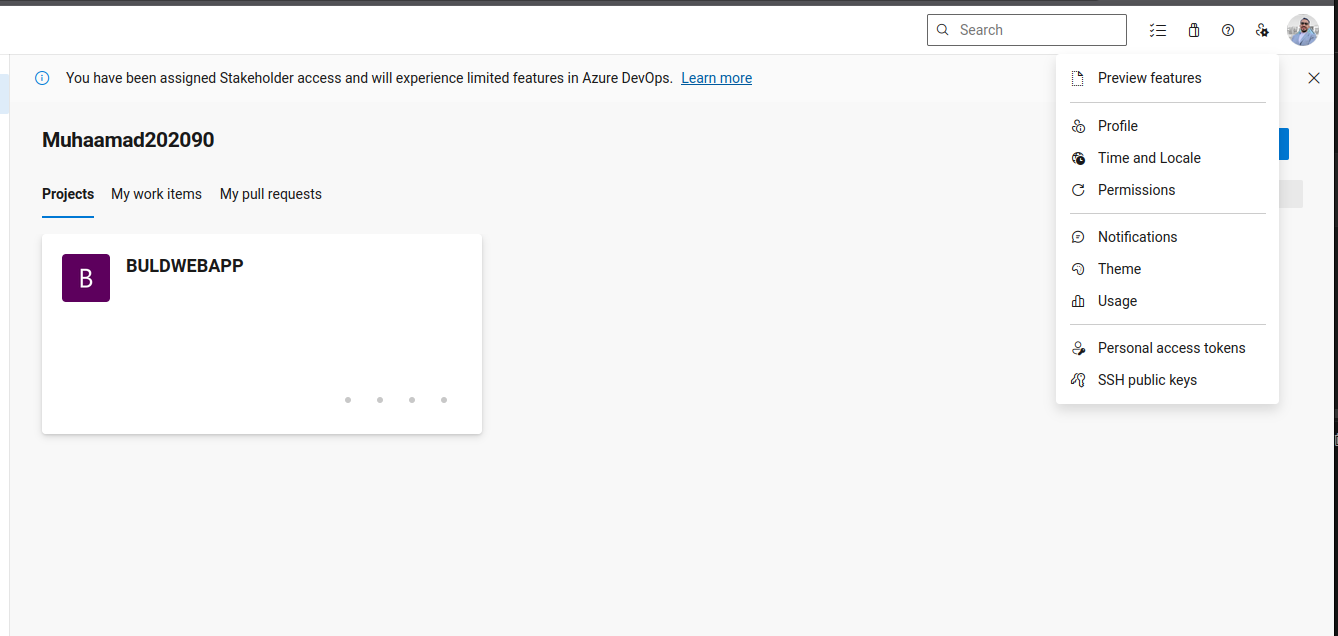
Click ”+ New Token”

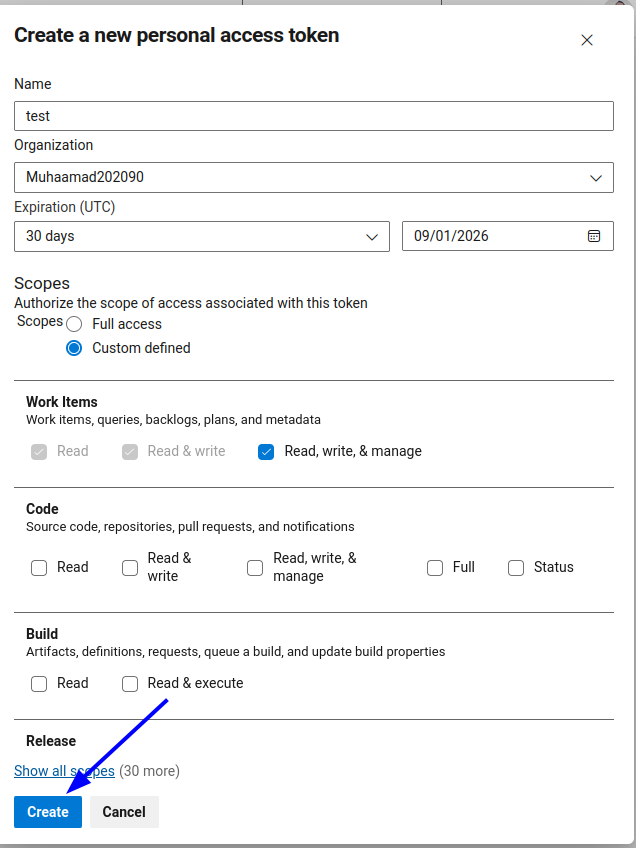
- Settings:
- Name:
Process-Migration-Source - Organization: Your source organization
- Expiration: 30 days (or as needed)
- Name:
- Click “Create”
- COPY THE TOKEN (you can’t see it again!)
Create PAT for Target Organization:
Repeat the same steps for your target organization.
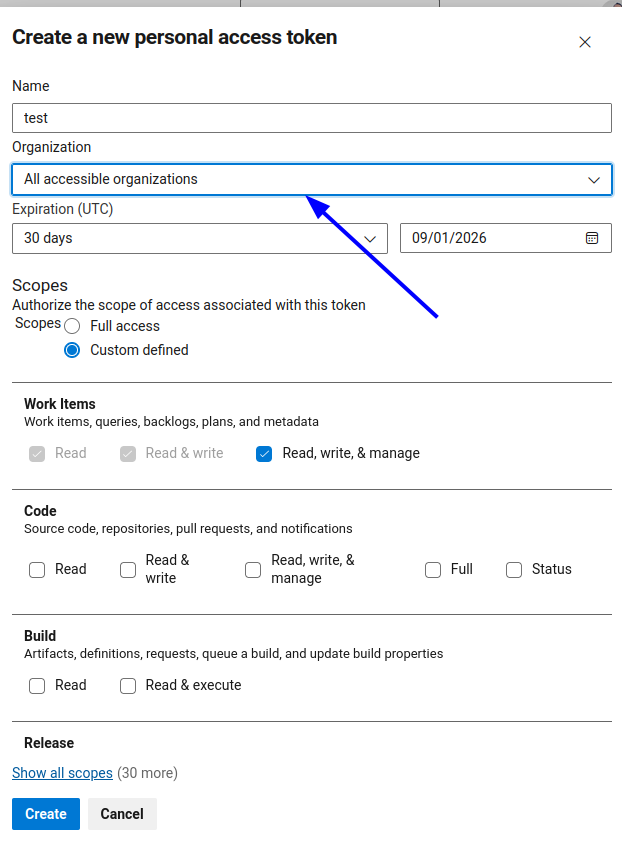
Info: you can create one PAT for both target and source organization
⚠️ IMPORTANT: Keep your PATs secure! Never commit them to version control.
Installation
Default: Install Globally via NPM (Node.js)
1
2
3
4
5
# Install globally
sudo npm install process-migrator -g

# Verify installation
process-migrator --version
Alternative: Clone from GitHub
1
2
3
4
5
6
7
8
9
10
11
12
13
# Clone the repository
cd ~
git clone https://github.com/microsoft/process-migrator.git
cd process-migrator

# Install dependencies
npm install

# Build the project
npm run build

# Verify build
ls -la build/nodejs/nodejs/Main.js
Configuration
Important: The migrator always runs on a single process. You must supply sourceProcessName; it will export/import only that process. It will not merge or move all processes automatically, and omitting the name will fail. Name conflicts: Import will fail if the target already has a process with the same name. Set targetProcessName to a unique value or rename/remove the existing target process before running.
Create Configuration File
Create a file named migration-config.json:
1
nano migration-config.json
Paste this template:
1
2
3
4
5
6
7
8
9
10
11
12
13
14
15
16
{
    "sourceAccountUrl": "https://dev.azure.com/YOUR_SOURCE_ORG",
    "sourceAccountToken": "YOUR_SOURCE_PAT_TOKEN",
    "targetAccountUrl": "https://dev.azure.com/YOUR_TARGET_ORG",
    "targetAccountToken": "YOUR_TARGET_PAT_TOKEN",
    "sourceProcessName": "YOUR_SOURCE_PROCESS_NAME",
    "targetProcessName": "YOUR_TARGET_PROCESS_NAME",
    "options": {
        "processFilename": "output/exported-process.json",
        "logLevel": "information",
        "logFilename": "output/processMigrator.log",
        "overwritePicklist": true,
        "continueOnRuleImportFailure": true,
        "skipImportFormContributions": false
    }
}
Configuration Parameters Explained:
| Parameter | Required | Description | Example |
|---|---|---|---|
sourceAccountUrl | Yes (export/migrate) | Source organization URL | https://dev.azure.com/MySourceOrg |
sourceAccountToken | Yes (export/migrate) | Source PAT token | Your PAT token |
targetAccountUrl | Yes (import/migrate) | Target organization URL | https://dev.azure.com/MyTargetOrg |
targetAccountToken | Yes (import/migrate) | Target PAT token | Your PAT token |
sourceProcessName | Yes (export/migrate) | Process name to export | My Custom Agile |
targetProcessName | Optional | Override process name in target | My Custom Agile - Migrated |
Options Explained:
| Option | Default | Description |
|---|---|---|
processFilename | output/process.json | File to save/read exported process |
logLevel | information | Log level: verbose, information, warning, error |
logFilename | output/processMigrator.log | Log file path |
overwritePicklist | false | Overwrite picklists if they exist in target |
continueOnRuleImportFailure | false | Continue if rule import fails (e.g., identity not found) |
skipImportFormContributions | false | Skip custom form controls (use if extensions not available) |
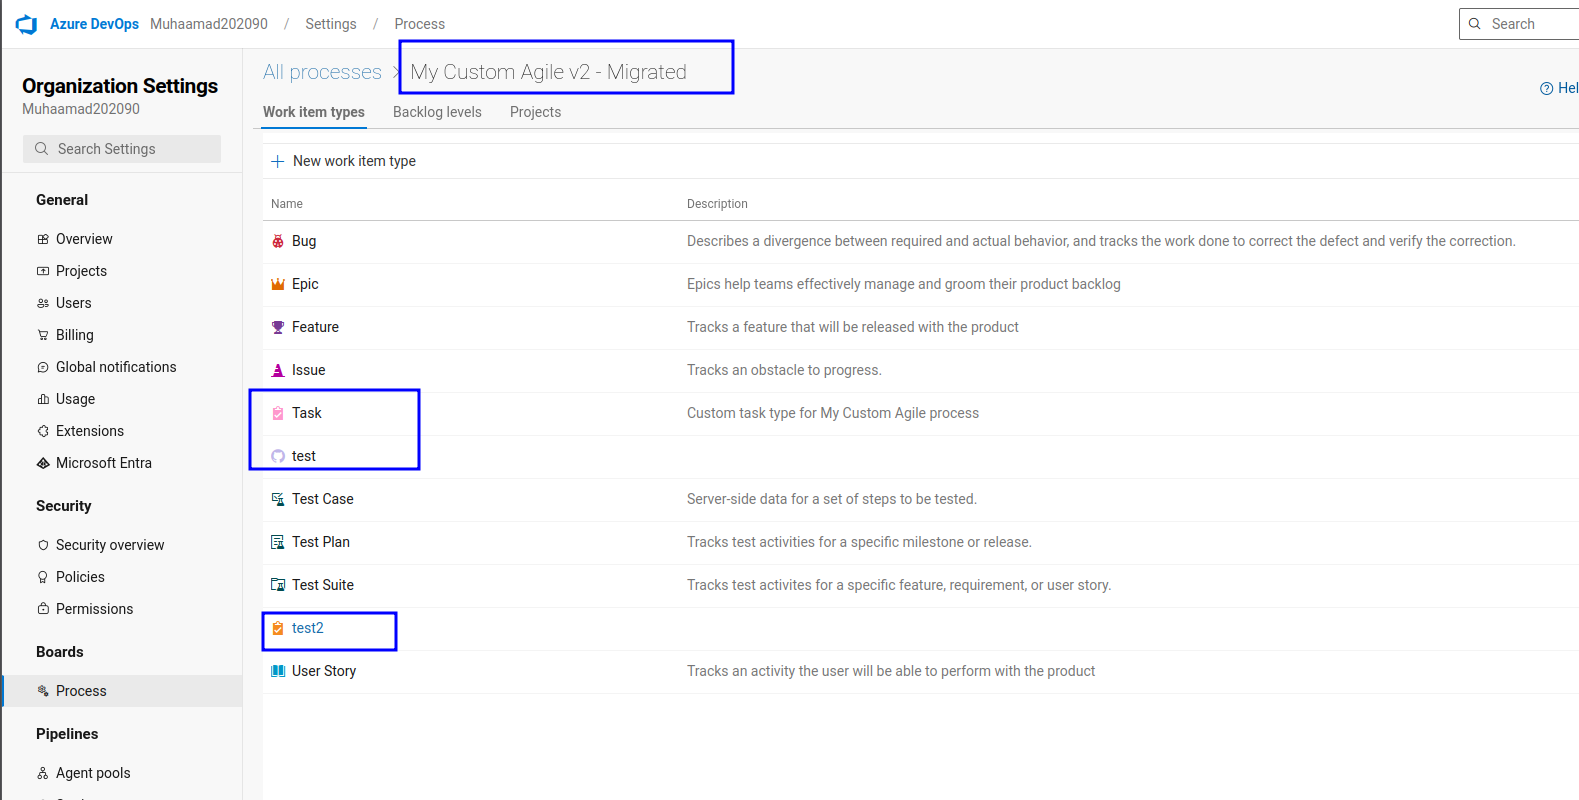
Before Running the Migration (Testing Only)
Create test inherited process, custom fields, states, and work item types
Inherited Process with new work item type
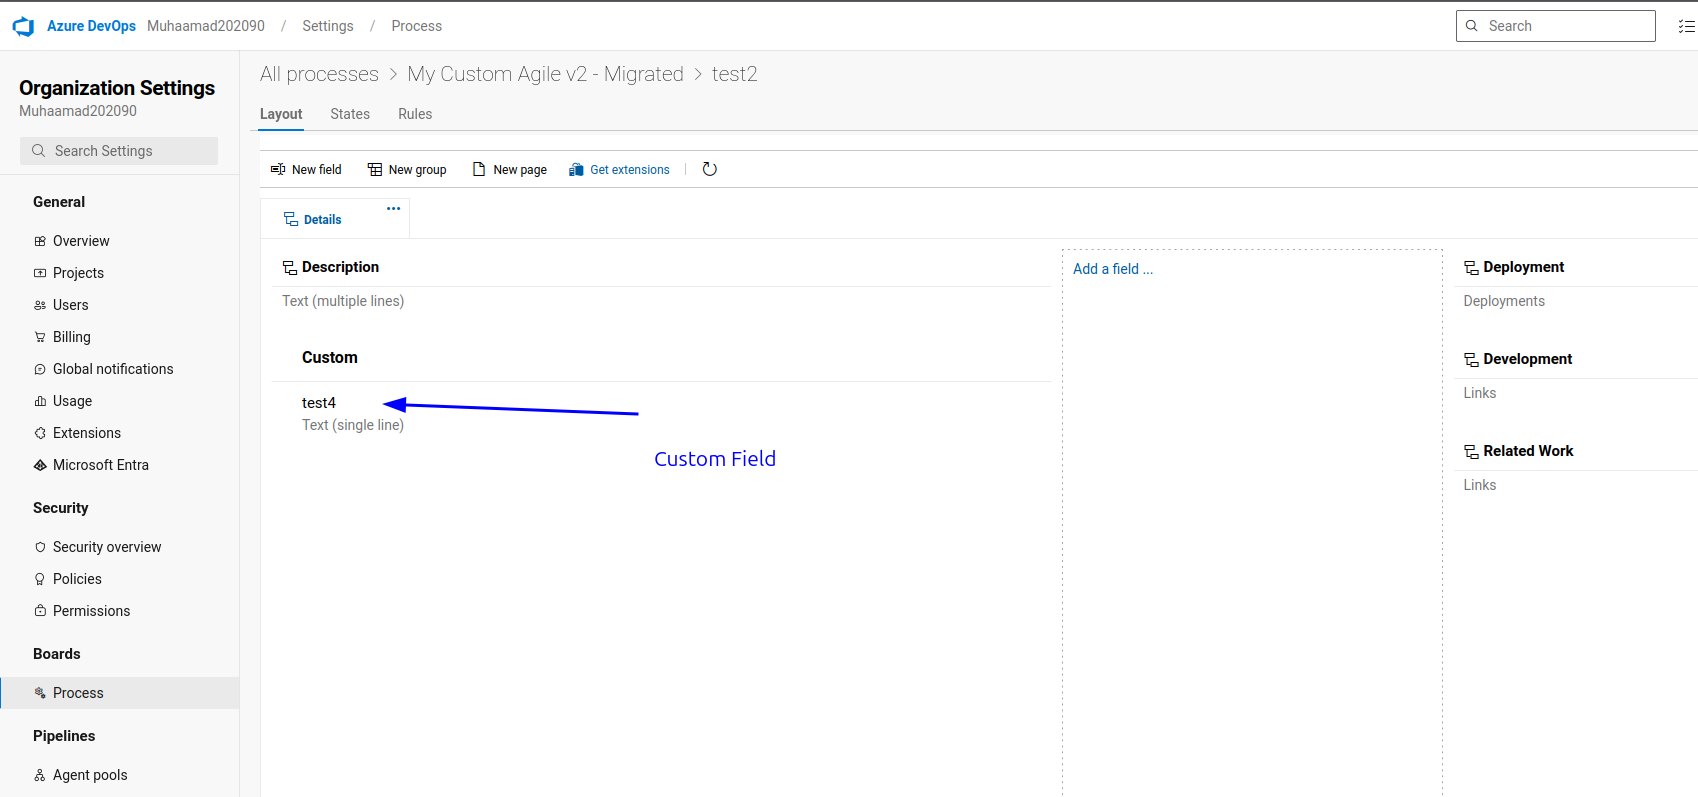
New Custom Field Created
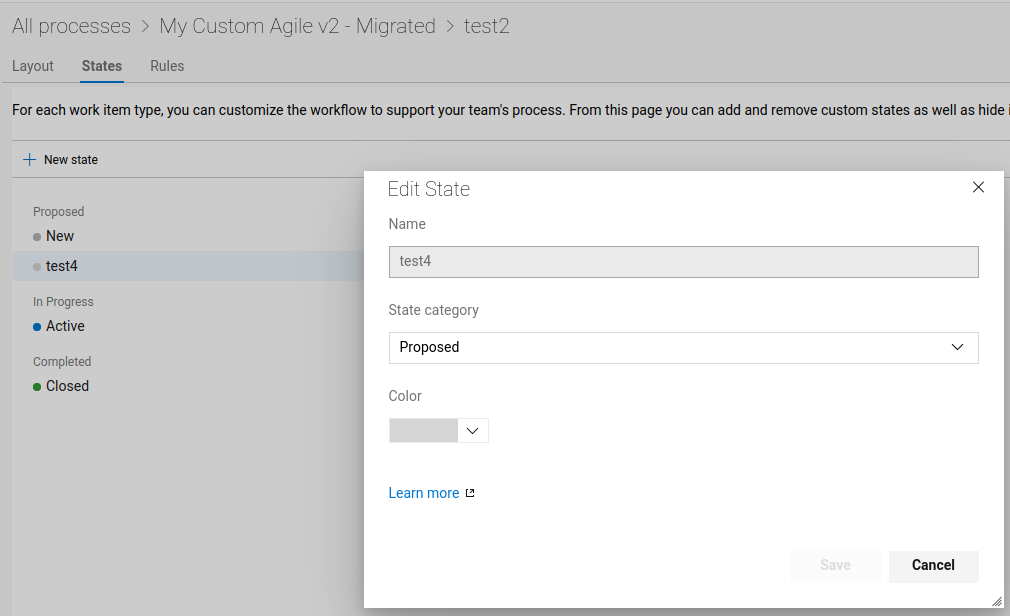
New state for the test work item type
Running the Migration
Method 1: Complete Migration (Recommended)
Export from source and import to target in one command:
1
2
3
4
5
6
# If cloned from GitHub
cd ~/process-migrator
node build/nodejs/nodejs/Main.js --mode=migrate --config=migration-config.json

# If installed globally
process-migrator --mode=migrate --config=migration-config.json
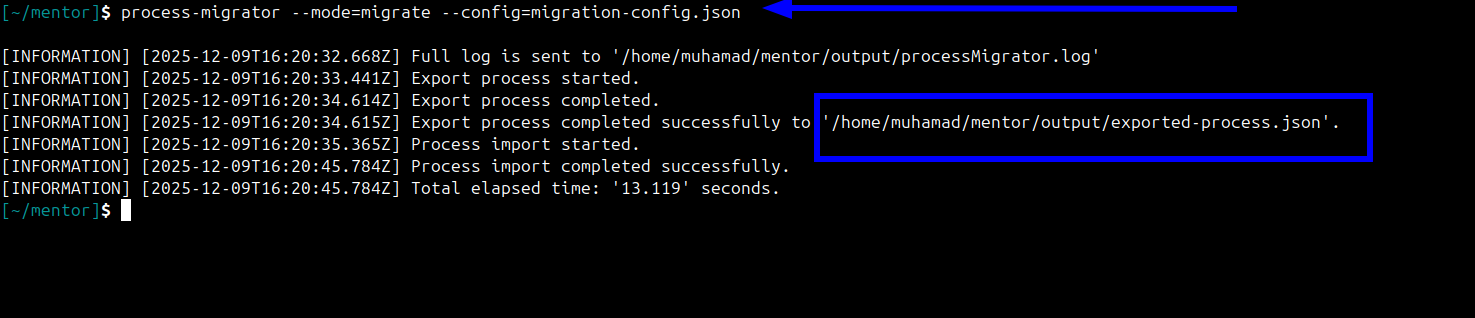
This will:
- Export process from source organization
- Save to
output/exported-process.json - Import process to target organization
- Complete in ~20-60 seconds
Name conflict behavior: If the target already has a process with the same name, import stops during pre-validation and nothing is created. The log shows errors like:
1
2
[ERROR] ... Pre-Import validation failed. No artifacts were created on target process
[ERROR] ... Process import validation failed. Process with same name already exists on

Set targetProcessName to a unique value or rename/remove the existing target process before migrating.
Method 2: Step-by-Step Migration
For more control, do export and import separately:
Step 1: Export from Source
1
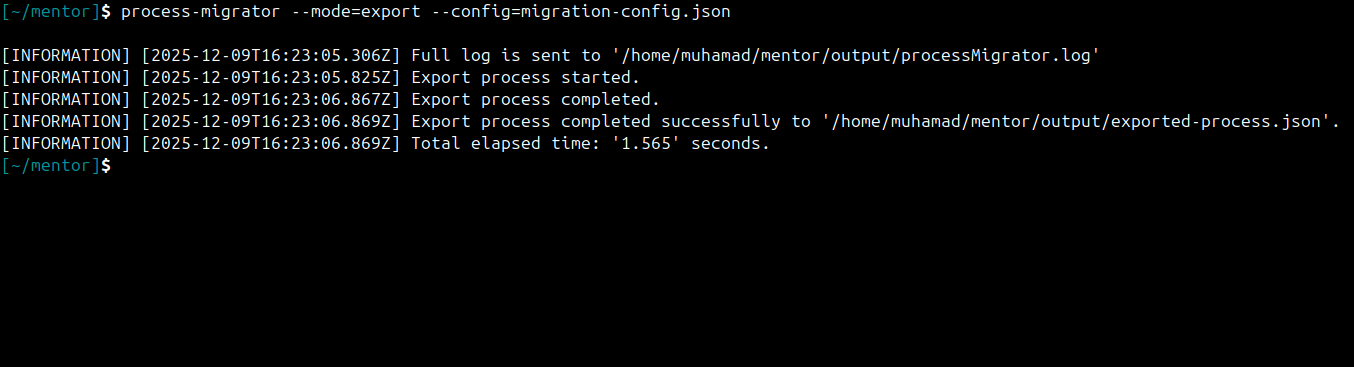
process-migrator --mode=export --config=migration-config.json
Output:
1
2
3
[INFORMATION] Export process started.
[INFORMATION] Export process completed.
[INFORMATION] Export completed successfully to 'output/exported-process.json'.
Step 2: Review Exported Data (Optional)
1
2
3
4
5
6
# View exported process using cat or any editor
cat output/exported-process.json | jq . | less
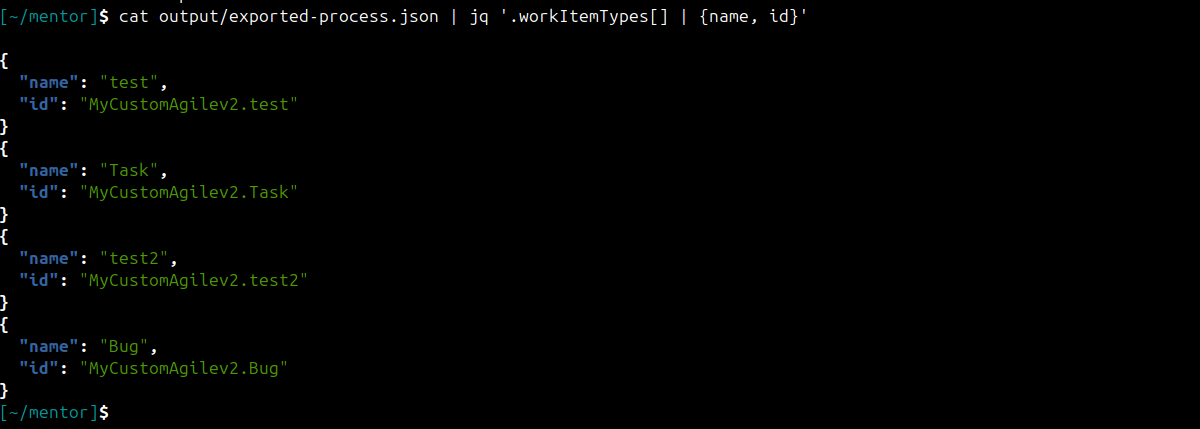
# Check work item types
cat output/exported-process.json | jq '.workItemTypes[] | {name, id}'
you will find the custom work item types created
1
2
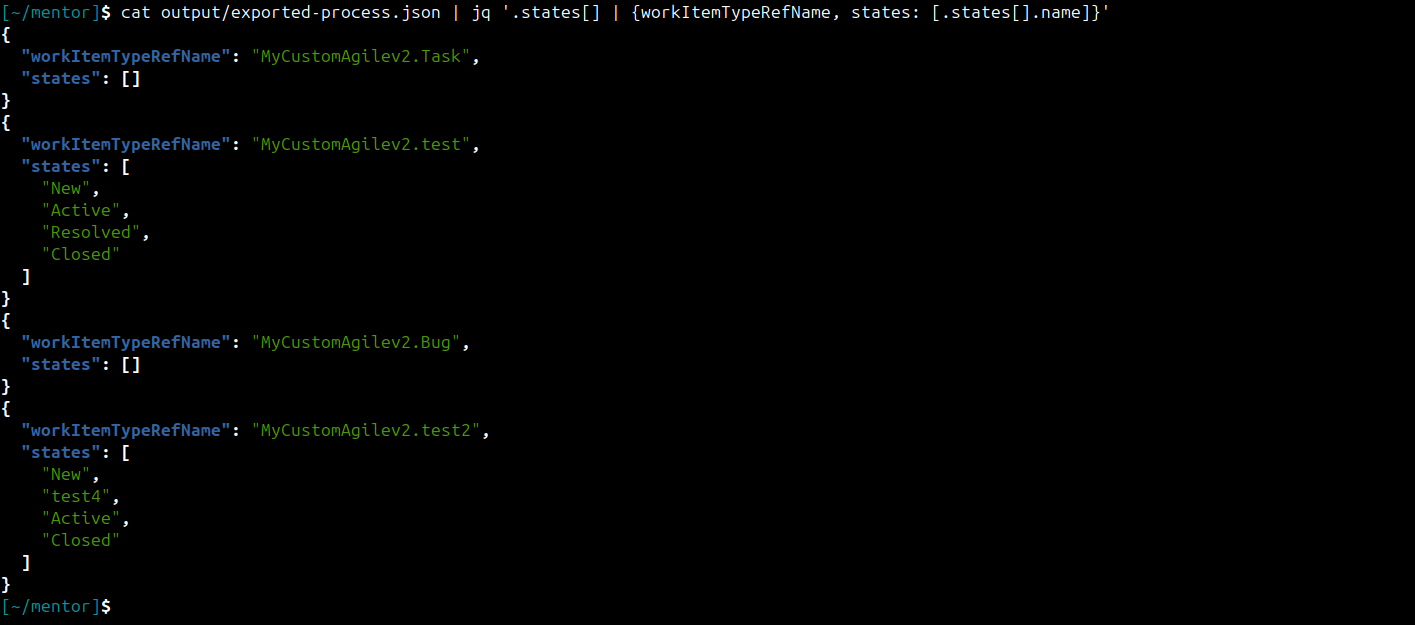
# Check states
cat output/exported-process.json | jq '.states[] | {workItemTypeRefName, states: [.states[].name]}'
You will find the custom work item states created
Step 3: Import to Target
1
node build/nodejs/nodejs/Main.js --mode=import --config=migration-config.json
Output:
1
2
[INFORMATION] Process import started.
[INFORMATION] Process import completed successfully.
Verification
1. Check Migration Logs
1
2
3
4
5
6
7
8
# View the log file
cat output/processMigrator.log

# Check for errors
grep ERROR output/processMigrator.log

# Check for warnings
grep WARNING output/processMigrator.log
2. Review Exported Data
1
2
3
4
5
6
# View exported process using cat or any editor
cat output/exported-process.json | jq . | less

# Check work item types
cat output/exported-process.json | jq '.workItemTypes[] | {name, id}'
you will find the custom work item types created
1
2
# Check states
cat output/exported-process.json | jq '.states[] | {workItemTypeRefName, states: [.states[].name]}'
You will find the custom work item states created
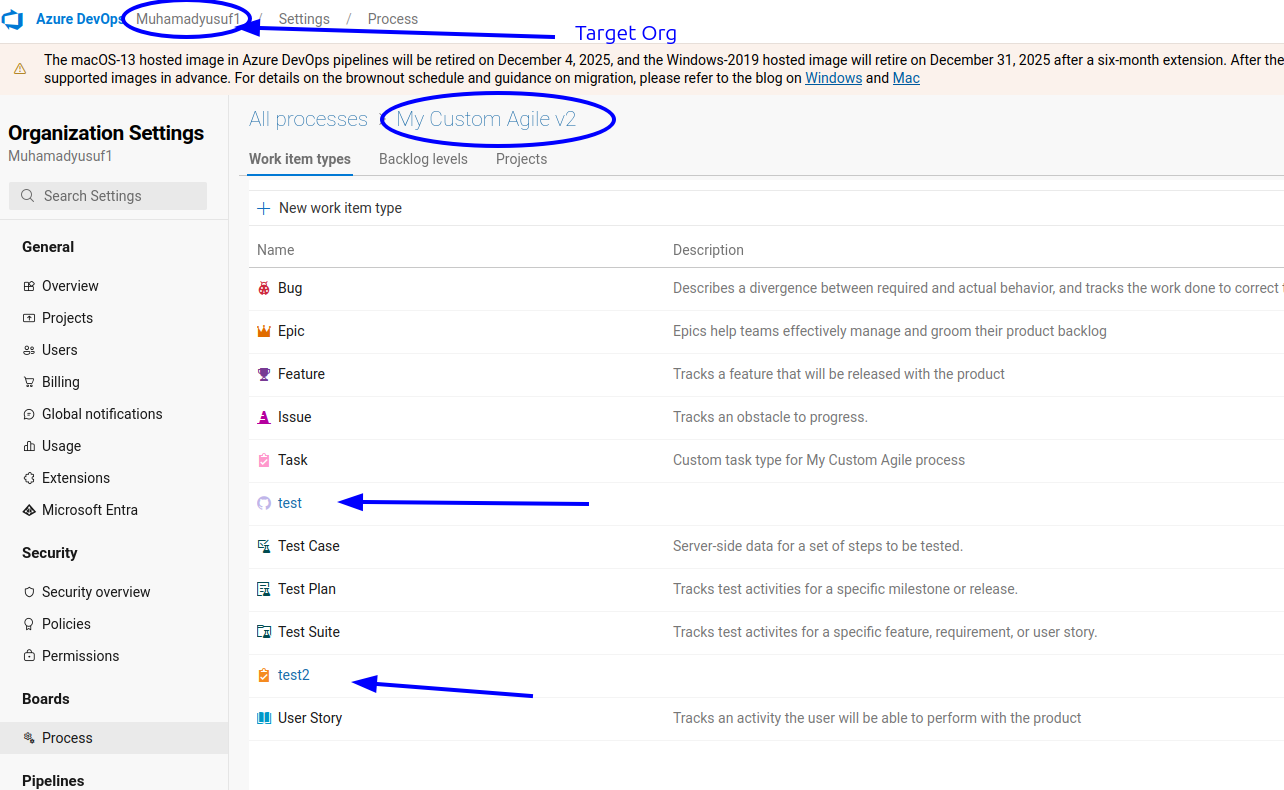
3. Verify in Target Organization
Open in browser:
1
https://dev.azure.com/YOUR_TARGET_ORG/_settings/process
Look for your migrated process in the list.
or Check Process Exists:
1
2
# Using curl
curl -s -u :YOUR_TARGET_PAT "https://dev.azure.com/YOUR_TARGET_ORG/_apis/work/processes?api-version=7.1" | jq '.value[] | select(.name | contains("YOUR_PROCESS_NAME"))'
Check Work Item Types:
1
2
3
4
5
# Get process ID from previous step
PROCESS_ID="your-process-id"

# Check work item types
curl -s -u :YOUR_TARGET_PAT "https://dev.azure.com/YOUR_TARGET_ORG/_apis/work/processes/$PROCESS_ID/workItemTypes?api-version=7.1" | jq '.value[] | {name, referenceName, customization}'
4. Use Verification Script
Create a verification script:
1
2
3
4
5
6
7
8
9
10
11
12
13
14
15
16
17
18
19
20
21
22
23
24
25
26
27
#!/bin/bash
# verify-migration.sh

TARGET_ORG="https://dev.azure.com/YOUR_TARGET_ORG"
TARGET_PAT="YOUR_TARGET_PAT"
PROCESS_NAME="YOUR_MIGRATED_PROCESS_NAME"

echo "Verifying process migration..."

# Check if process exists
PROCESS_INFO=$(curl -s -u :$TARGET_PAT "$TARGET_ORG/_apis/work/processes?api-version=7.1" | jq ".value[] | select(.name == \"$PROCESS_NAME\")")

if [ -z "$PROCESS_INFO" ]; then
    echo "Process not found"
    exit 1
fi

PROCESS_ID=$(echo "$PROCESS_INFO" | jq -r '.typeId')
echo "Process found: $PROCESS_NAME"
echo " ID: $PROCESS_ID"

# Check work item types
WIT_COUNT=$(curl -s -u :$TARGET_PAT "$TARGET_ORG/_apis/work/processes/$PROCESS_ID/workItemTypes?api-version=7.1" | jq '.value | length')
echo "Work item types: $WIT_COUNT"

echo ""
echo "Migration verified successfully!"
REST API Documentation
Migration Checklist
Use this checklist for your migration:
Pre-Migration
- Node.js installed (v8.11.2+)
- Repository cloned and built
- Source PAT created with correct permissions
- Target PAT created with correct permissions
- Source process name identified
- Configuration file created
- Test migration in non-production environment
Migration
- Run export (or migrate mode)
- Check for errors in console output
- Review exported-process.json (optional)
- Run import (if using step-by-step)
- Check migration logs
Post-Migration
- Verify process exists in target
- Check work item types are present
- Verify states and workflows
- Check custom fields
- Test form layouts
- Update target project to use new process
- Test creating work items
- Document any manual adjustments needed
- Revoke migration PATs
Success Criteria
Your migration is successful when:
Process appears in target organization
All custom work item types are present
States and workflows are correct
Custom fields exist and are configured
Form layouts match source
No errors in migration log
Can create work items using the new process
License
Microsoft Process Migrator is licensed under the MIT License.
Credits
- Tool: Microsoft Process Migrator
- Repository: https://github.com/microsoft/process-migrator
- Maintainers: Microsoft and community contributors